Showing posts with label fountain pen tips. Show all posts

Monday, July 7, 2014

How to completely disassemble a Lamy Z24 converter

I've had my Lamy AL-Star fountain pen for a few years, along with the popular Z24 converter and while I love this pen, one thing kept me from using it more often in my rotation: the Z24 converter can be hard to clean. Ink likes to fill the recesses inside it, stick to the nooks and then dry up.

The last time I cleaned the converter, right after I finished the Diamine Green Black that was in it, it literally took me 15 minutes of flushing the Z24 over and over to realize that I wasn't going anywhere. As soon as I thought it was clean enough and shook it, out flew some more greenish water.

I decided that I had enough. I searched the internet for how to disassemble the Lamy Z24 converter and the only thing I could come up with was people assuring other people that it could be done, that they themselves had done it easily. Well, I tried in the past and failed. It seemed to me back then that the damn parts which make up the converter are fused together.

This time I used a different method and succeeded. What follows is a video (my first production video ever) of the procedure, as well as a written explanation with photos. Please excuse the amateurish quality of the video as well as my superglue-covered fingers. Also, please subscribe to my newly-minted Youtube channel if you wish, in the right sidebar.


What you're gonna need for the Z24 disassembly procedure is quite simple: a thin rod preferably made from plastic or wood, which can fit inside the converter, and your fingernails.

I used the plastic piston from an insulin syringe. I have a lot of them lying around, not because I'm diabetic but because I bought a pack of 100 a few years ago so I could use them to fill my cartridges, converters and fountain pens with ink. For this purpose the piston works wonderfully.


The first thing you want to do is to remove the black metal ring at the twisty knob end. This is easily removed by pulling outward with your fingers, perhaps twisting it a little if it feels stiff.


Now comes the tricky part. Underneath the metal ring you will notice that the red knob is mated to the black plastic piston assembly. This black part is actually the one that holds the piston inside the converter, and joins the knob and the piston. In the past I've tried pulling the assembly out with my fingers. Though my grip is pretty strong, I've never managed. The black part can be twisted but that doesn't help to extract it.

So I had to figure out a different way. This is where your nails come into action. Alternatively, you can use some sort of plastic shim, but I prefer the nails. I wouldn't recommend metal (like a knife blade for instance) because it will most likely damage the soft plastic of the converter.

You need to wedge your nail between the black part and the transparent converter body. Since the two parts seem melded together, it might help to bend the converter a little until a gap is formed between the two. At this point you should be able to slide your fingernail inside the gap.


You will now perform 2 simultaneous motions. First, you slide your fingernail along the gap, while rotating the black assembly (remember, this one is rather stiff to rotate). At the same time you pull outward with the other hand until the whole thing pops out.


There you go, the piston assembly has been removed from the transparent converter body. You can now unscrew the piston for cleaning but don't tell me I should have also detached the black assembly from the red knob because that would be pointless. Ink doesn't get between those parts anyway.


What remains is the small black ring/washer/valve/thing at the business end of the converter. This little part always bothered me the most because ink likes to accumulate between it and the walls of the converter, thus making it nigh impossible to wash the converter thoroughly. Well, not anymore buddy. Time to use the syringe piston.


Grab the syringe piston or whatever thin rod you have and stick it inside the converter. I would stay away from metal rods because, again, they could damage the soft plastic.


Brace the rod against the hard surface of a table and press down hard on the converter while pushing on the black washer thing until it pops out. Keep a finger or two on the opening because the sudden release could shoot it through the ceiling.


And there you have it. Taking the Lamy Z24 converter apart turns out to be a pretty simple procedure, but one which has eluded me for years. Now I'm hoping my method will bring relief to thousands of Lamy aficionados plagued by this very same conundrum.


I hope you have enjoyed this how-to and if you have a different method of doing this I'd love to hear about it in the comments.
Monday, May 7, 2012

TWSBI Diamond 530 parts

For the first time since I've had my TWSBI Diamond 530, after a year of using it, I decided it was about time to take it apart to pieces and give it a thorough cleaning. I have used only two inks in it: Noodler's Polar Brown and Waterman Havana Brown. It is very indicated to clean your fountain pen when changing inks but I was too lazy to do that when I switched from Polar Brown to Havana Brown. Thus, Havana got mixed with the few drops of Polar that still remained in the pen.

The result was a darker Havana Brown but in no way was the quality of the writing compromised. The Diamond 530 wrote as well as before, with the broad nib. As a parenthesis, I haven't used the original EF nib for a long time. Once I fell in love with the B nib I saw no reason to fall back on the EF.

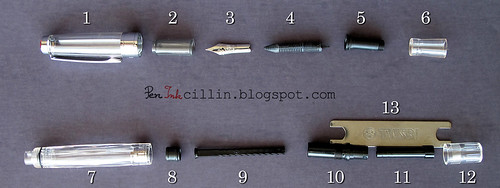
Here's my TWSBI Diamond 530 disassembled into its basic parts.

TWSBI Diamond 530 parts

I really like a fountain pen that can be broken apart as much as the TWSBI. It makes for easy and thorough cleaning, not to mention that you can learn more about the inner workings of the pen. I'm going to give a short description of each of the parts in this exploded view.

  1. Cap - it can be further disassembled by removing the inner screw that fastens the clip. I didn't have the correct tool for this so I skipped it.
  2. Inner cap - this little piece helps seal the nib inside the cap so that the ink doesn't dry. It is friction fit and can be tricky to remove, unless you know the trick. It's quite easy actually: take a pencil (preferably one with an eraser at the end), wrap an elastic band around the eraser, stick it inside the cap until you feel it squeezing tightly inside the inner cap, and the pull it out. It should drag the inner cap with it.
  3. Nib
  4. Feed
  5. Inner section - this piece holds the nib and feed together. It is keyed such that there's no chance of fitting the nib and feed in the wrong position. Notice that there's also a small o-ring there which I haven't removed.
  6. Outer section - it has 4 tiny grooves distributed equally on the inside. When you push the inner section inside it, make sure to match the grooves, otherwise this piece might crack over time. 3,4,5 and 6 form the nib unit.
  7. Barrel - it has another o-ring which seals the nib when the cap is screwed on. At the other end there's a metal inner collar with threads to which the piston mechanism is attached.
  8. Piston
  9. Piston rod
  10. Piston holding thingy - sorry, don't know what this part is called but it screws on to the end of the barrel, counterclockwise. The piston rod goes through it.
  11. Piston activation thingy - this bit actually operates the piston rod. It has a spiral thread inside which fits the spiral on the rod.
  12. Piston knob - This screws on to #10 and actuates #11.
  13. Wrench - this comes with the pen and is used to remove #10.

So this is what makes the TWSBI Diamond 530 (and also the 540) tick. I apologize if I haven't named the parts correctly but I have no idea what the technical terms for some of them are. Now the tricky part will be to put it back up together!

Monday, April 2, 2012

3 dollar nib flossing tool

Some time ago I showed you how to make a cheap nib flossing tool from a security tag found on many store-bought objects. But what if you want to go big? What if you want to invest some serious money into a serious tool?

Well, the good news is that you don't have to break the bank to do that. I guess the main disadvantage with the shim I was talking about in my previous post is that it only has one size. For certain situations it might be too thin. If you need something thicker that shim might not be for you.

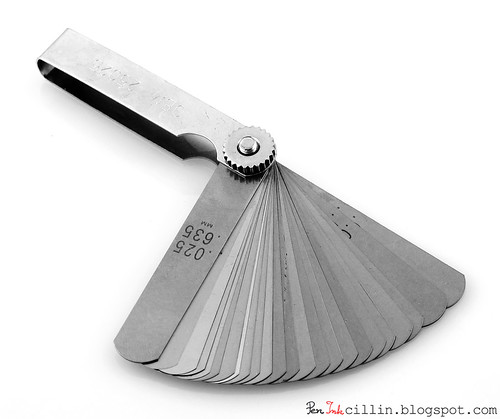
I can't take credit for this idea because I read it somewhere on the internet but it turns out that a really good nib flossing tool is one of those feeler gauges that are used to measure the distance between two objects that are extremely close. Typically it is used to set the distance between the electrodes in a car's spark plugs (though I understand modern spark plugs don't require this adjustment anymore). Here is mine:
Feeler gauge

This tool can be purchased in any auto-store. I paid about $3 for mine. It's all-metal and the quality feels very high.

The thickness of the shims varies between .0015-inch/.038mm and .025-inch/.635mm. The thinnest one feels thinner than paper. Seeing that not all nibs can be flossed in the same way, I would say that this tool is a very good investment. One word of caution though: mine was (and still is) covered by a thin film of lubricant. You might wanna rub it off before using it.

Monday, February 6, 2012

Cheap nib flossing tool

What's a nib flossing tool? It's something thin enough that it can slip between the tines of a nib. And why would you want to do that? For two main reasons: to clean paper fibers stuck between the tines (which can affect the quality of writing) and to widen the distance between the tines (to increase ink flow).

I know that most of us who are not nib meisters are reluctant to fiddle with our nibs. Still, sometimes it's worth attempting a quick fix and very often a little flossing can cure a stubborn nib.

In the past I have suggested using a piece of 35mm film, which is usually thin enough that it fits in the tight space between a nib's tines. But who has 35mm film these days? Recently I have discovered a very simple tool that anyone can procure and it won't cost you a cent.

The thing I'm talking about is one of those electronic tags that are very often attached to merchandise such as clothes and electronics, to prevent them from being stolen. Here's how it looks.


If you peel the back, you will see the innards.


Peeling the transparent layer will yield you 2 metal shims that are on the thin side but will do a great job flossing any nib, no matter how tight the tines are.


Here it is in action, with the nib from my Noodler's Ahab.


So next time you buy something that has a tag attached, don't throw it away. Instead, salvage these shims because they might come in handy later.

Thursday, July 14, 2011

How to refill your Pilot Varsity

In my last post I reviewed the Pilot Varsity "disposable" fountain pen. Now, I will explain why the word "disposable" is within quotes.

Although Pilot intended for this to be a throwaway pen, some crafty folks have come up with various ways in which to refill it with their own ink. There are many methods out there but my favorite, and the one I use exclusively, is to remove the nib and feed.

Pilot Varsity parts

But first, why would someone refill such a cheap fountain pen? For starters, $3 might not seem a lot but if you keep throwing these pens away, it adds up. Then, there's the fact that the nib writes quite well for the price. Finally, this is a great pen to abuse (say, at work) because if something happens to it, you haven't just lost or destroyed your expensive Montblanc.

Pilot Varsity exploded

There's only one tool that I use for this operation: a pair of needle-nosed pliers. Well, there's also a rag or a piece of cloth (not shown in the photo) that I use between the pliers and the nib/feed so that I don't scratch it. Even better would be a strip of rubber but I don't have any handy.

Pilot Varsity tools

Here are the quick and easy steps needed to refill the Pilot Varsity:
  1. Grip the nib from the side with the pliers but don't forget to cushion with the rag. (You can also remove the nib from the beginning by sliding it off the plastic feed). If the nib has been removed, grip the feed directly.
  2. Hold the pliers in your other hand. 
  3. Brace the tip of the pliers with the thumb of the hand holding the pen.
  4. Apply just enough pressure to prevent the jaws of the pliers from slipping but not too much to crack the plastic feed.
  5. With the thumb, push upwards until the feed is suddenly freed from the section.

Taking apart the Pilot Varsity

Once you got the feed out, you can clean the pen thoroughly. You should rinse the feed really well because ink gets embedded in the wick that goes through it and, if you don't clean it well, it will mix with the new ink you put in. Let it dry for a day or two, or you can even use it right away if you don't mind a little dilution in your ink.

Pilot Varsity nib and feed

Pilot Varsity nib and feed

The Pilot Varsity has a very decent capacity of at least 2ml (my estimate). Notice that I've also removed all the paint from my pen, to make it completely transparent.

Pilot Varsity parts

After filling with ink, just plug the feed back in the section. When it's settled all the way in you will hear (and feel) a distinct click. I like to grip the feed with a cloth for more friction when I plug it in.

That's it then: you have just refilled your Pilot Varsity! I have refilled my first Varsity no less than 4 times already, with: Noodler's Navajo Turquoise, Noodler's Polar Blue, a secret ink mixture soon to be revealed and J Herbin Vert Olive. It looks to me that this pen has a lot of life left in it (the nib feels brand new) so I've got many inks lined up for it. I use the Varsity exclusively at work where it lasts for about 2 weeks of note-taking and scribbling.

So, go forth, refill your Pilot Varsities and enjoy your hacked pen to the max!

Saturday, May 7, 2011

How to destroy a Noodler's piston filler fountain pen

In my review of Noodler's North African Violet ink, I promised I would tell you the story of how I managed to destroy my Noodler's piston filler fountain pen.

It is a sad story but life is sometimes like that and we can only learn from such tragedies.

The saga started when I used North African Violet in my Noodler's demonstrator. I did notice that the ink was staining the interior of the pen but I thought nothing of it.

I believe I had a hand in destroying this pen because I left the ink in it to dry. Unfortunately, I've come to realize that Noodler's fountain pens aren't very well designed. Ink either leaks if you store the pen with the nib pointing down, or it dries up if you store it in any other way.

Truth is, I just had a few drops left in it, that's why it probably dried like that. In about 2 weeks the ink was gone.

I tried cleaning the pen in the usual way, by removing the nib and feed and flushing the inside with water. That didn't work. It was clear that North African Violet likes to stain.

The next step was to disassemble the piston and dunk the piston assembly and the barrel in an ammonia solution overnight. That didn't help either. I barely managed to get a tiny bit of purple stain off.

Next, I used a q-tip with rubbing alcohol on the inside of the barrel. This helped a little but the plastic was still stained almost as bad as before.

Finally, I decided to soak the barrel and piston assembly in a more concentrated ammonia solution and I left it there for a couple of days. When I took the barrel out, not only was it still stained but it was ruined.

I immediately noticed that the plastic material of the barrel had developed some tiny bubbles and a very thin layer of plastic seemed to be peeling off. I guess the ammonia had dissolved the resin from which the pen is made. Worse, when I tried to re-assemble the piston, I couldn't. It wouldn't fit through the barrel anymore.

Noodler's stained barrel

It looked like the barrel had shrunk. Moreover, it was bent out of shape. I had placed the barrel in a small bowl filled with the ammonia solution and I suspect that it sagged in the middle while supported at each end by the sides of the bowl. I didn't know that ammonia could be so nasty.

Noodler's piston filler disassembled

So now I'm left with a useless fountain pen and I don't think there's anything left to do that can save it. You can tell from photo how badly the barrel is affected.

After all this, I'm still not sure what single factor contributed to the destruction of my Noodler's fountain pen. I admit that I'm largely to blame for letting the ink dry and then soaking it for too long in the concentrated ammonia solution but at least I will know better next time and I hope others will see this as a cautionary tale and avoid the same mistakes I made.

Saturday, February 5, 2011

How to revive a dead Lamy AL-Star

Among the goodies I got with my first Jetpens purchase, the Lamy AL-Star in aluminum with an EF nib was a top contender toward becoming my main fountain pen. Alas, it turned out I received a dud. The pen was close to being DOA.

The pen came with a blue Lamy ink cartridge but I also bought a Z24 converter to use with bottled ink after the cartridge ran out.

As soon as I started using the AL-Star, I realized that I was having problems. The pen showed several symptoms. The line was faint but I assumed that came from the Lamy ink which wasn't very saturated. The nib skipped a lot and usually it was scratchy. The flow would stop for long periods of time after which it would resume after much coaxing. It would write "normally", but not very satisfyingly, and then it would stop again without warning.

I attributed all my woes to the Lamy ink and cartridge. I told myself that once I'm done with that cartridge I can switch to Noodler's Heart of Darkness (which was the ink I intended to use in this pen) and everything would be ok. I was wrong. My troubles had only started.

In what follows is a list of things I did in order to get this pen working.

Lamy AL-Star disassembled

1) After finishing the Lamy cartridge, I flushed both the pen and converter (although I hadn't used the converter yet) with water and a couple of drops of dish washing liquid. I then flushed them all multiple times with just water.

2) I loaded up the pen with Noodler's Heart of Darkness ink. The problem immediately got worse. I managed to get the ink flowing but the line was very faint and scratchy despite the fact that this ink is usually very dark and saturated so it was clear something was very wrong with the flow.

3) I thought maybe the pen didn't like the ink so I tried 2 more inks in it: Noodler's Navajo Turquoise and Noodler's Gruene Cactus Eel which is a lubricating ink. Neither worked. I started to despair and almost gave up on the pen.

4) I decided to try one final ink in it: Diamine Orange.

5) I also decided to use the ink cartridge I had saved, loaded with Diamine Orange via a syringe because I'd heard that sometimes cartridges provide a better flow than converters.

6) At the same time I took a closer look at the EF nib and noticed that the tines were touching. Holding it to the light showed no light shining through. I used a piece of 35mm film, pulling it multiple times between the tines, in an attempt to create some space between them. I started from the breathing hole and forced the film along the length of the tines, toward the tip. I also tried to do the same with an exacto knife but I wasn't very successful because the blade is comparatively thick compared to the space between the tines. Eventually I reached a point where I could discern light between the tines.

Having done all this, I loaded up the pen with the cartridge containing Diamine Orange and lo and behold, it started writing! Not only did it start but it now writes very smoothly and, dare I say, wetly. The ink flow is excellent and I even get the impression that it's smoother than my Pilot Prera.

Wow what a difference! The only beef I have now with the Lamy is that (perhaps as a result of spacing out the tines) it writes far from EF. Compared with a Japanese nib I'd hazard to guess that it feels more like a B or BB. But hey, it writes and I was almost prepared to chuck it in the trash.

So which of the above methods did the trick? It's hard to pinpoint but I think 4, 5 and 6 all might have contributed to an extent. It is possible that the Lamy doesn't like Noodler's ink but other people are using this ink in it with success. It is also possible that the converter sucks for some reason but then what is the point of having a converter?

Until I test the AL-Star with a different ink plus the converter, I will put my money on the nib. Because the tines were touching I believe the flow of the ink was severely restricted.

I've heard of other people having issues with their Lamys (AL-Star, Safari, Vista or Joy). If you do happen to experience a similar problem, I suggest you try some or all of my steps but just to save you time, I'd start with taking a look at the nib and spreading the tines a little if there's no light shining through. And if you're successful in fixing it, please drop me a line here.