The result was a darker Havana Brown but in no way was the quality of the writing compromised. The Diamond 530 wrote as well as before, with the broad nib. As a parenthesis, I haven't used the original EF nib for a long time. Once I fell in love with the B nib I saw no reason to fall back on the EF.
Here's my TWSBI Diamond 530 disassembled into its basic parts.
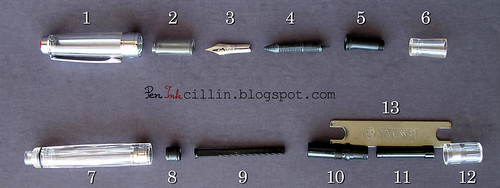
I really like a fountain pen that can be broken apart as much as the TWSBI. It makes for easy and thorough cleaning, not to mention that you can learn more about the inner workings of the pen. I'm going to give a short description of each of the parts in this exploded view.
- Cap - it can be further disassembled by removing the inner screw that fastens the clip. I didn't have the correct tool for this so I skipped it.
- Inner cap - this little piece helps seal the nib inside the cap so that the ink doesn't dry. It is friction fit and can be tricky to remove, unless you know the trick. It's quite easy actually: take a pencil (preferably one with an eraser at the end), wrap an elastic band around the eraser, stick it inside the cap until you feel it squeezing tightly inside the inner cap, and the pull it out. It should drag the inner cap with it.
- Nib
- Feed
- Inner section - this piece holds the nib and feed together. It is keyed such that there's no chance of fitting the nib and feed in the wrong position. Notice that there's also a small o-ring there which I haven't removed.
- Outer section - it has 4 tiny grooves distributed equally on the inside. When you push the inner section inside it, make sure to match the grooves, otherwise this piece might crack over time. 3,4,5 and 6 form the nib unit.
- Barrel - it has another o-ring which seals the nib when the cap is screwed on. At the other end there's a metal inner collar with threads to which the piston mechanism is attached.
- Piston
- Piston rod
- Piston holding thingy - sorry, don't know what this part is called but it screws on to the end of the barrel, counterclockwise. The piston rod goes through it.
- Piston activation thingy - this bit actually operates the piston rod. It has a spiral thread inside which fits the spiral on the rod.
- Piston knob - This screws on to #10 and actuates #11.
- Wrench - this comes with the pen and is used to remove #10.
So this is what makes the TWSBI Diamond 530 (and also the 540) tick. I apologize if I haven't named the parts correctly but I have no idea what the technical terms for some of them are. Now the tricky part will be to put it back up together!

Great article. I'll be interested to learn how difficult it was for you to reassemble the pen. I just used my first ink fill in my 540 and plan to just flush the pen without taking it apart. However, somewhere down the line, it may become necessary to disassemble the pen and this writeup certainly helped. Thanks. :-)
ReplyDeleteThanks! It shouldn't be too hard. The only "problem", if I can call it that, is screwing the piston rod at the correct depth.
ReplyDeleteI had a horrible time doing that the last time I took mine apart. Ended up with it basically locked on -- I couldn't get enough room between it and the barrel to get the wrench inbetween them. I nearly broke the pen trying to get it open again, but someone on FPN mentioned using a business card as a wrench (cut out the shape and then slip it between just like the wrench) -- that didn't quite work for me, but a dead Starbucks card was thin enough to fit between & sturdy enough to turn the piston rod assembly so I could finally unscrew it.
ReplyDeleteI guess the moral of the story is, be REALLY sure you have the piston rod at the right depth, and keep a plastic gift card around as an emergency wrench, just in case...
Thanks for the info! This will be a good reference in the future when I disassemble my 540.
ReplyDeleteThanks for that story. I'll have to keep it in mind when I reassemble.
ReplyDeleteYou are welcome!
ReplyDeleteTWSBI has a couple of great videos explaining the whole process. This link ( http://www.twsbi.com/Articles.asp?ID=254 ) is on dis-assembly and assembly of the section. This link ( http://www.twsbi.com/Articles.asp?ID=254 ) covers the mechanism assembly and how to avoid the problems you guys are sharing. They are both very helpful and I recommend watching them if you are taking the pen apart.
ReplyDeleteThanks for these links. I saw the videos a long time ago but I was in a bit of a hurry with this article and didn't have time to search for them.
ReplyDeleteI had no idea about that inner cap trick. You have finally allowed me to clean a part of my TWSBI that I thought would never be clean again
ReplyDeleteI'm glad I could help :) In fairness, I saw Brian Goulet do that in one of his videos. So the credit should go to him.
ReplyDelete